


In a previous article, we talked about the importance of designing the landscape of an integration project using diagrammatic representations. The diagrams showcased in that article were created using INTEGRTR Digital Transformer – a specialized diagram authoring software that makes it easier than ever to visualize complex enterprise integration landscapes.
While building this tool, we experimented with numerous frameworks and technologies before settling on ReactJS and HTML5 Canvas. Through this hands-on blog, we wanted to share our learnings and experience from the project for anyone looking to build similar tools or learn how HTML5 canvas works. We will start from the basics by trying to build a minimal diagram authoring tool to get you started on this journey.
We will be using react for managing our DOM view layer, konva.js (and it’s React bindings react-konva) for managing our Canvas related logic and a tiny state management library called @halka/state to manage our application state.
NOTE: We expect you to be fairly comfortable with React and React hooks. Don’t worry about the other libraries, we will explain their use cases as we go.
If you are here just for the source code, you can dive right into it – Github repo
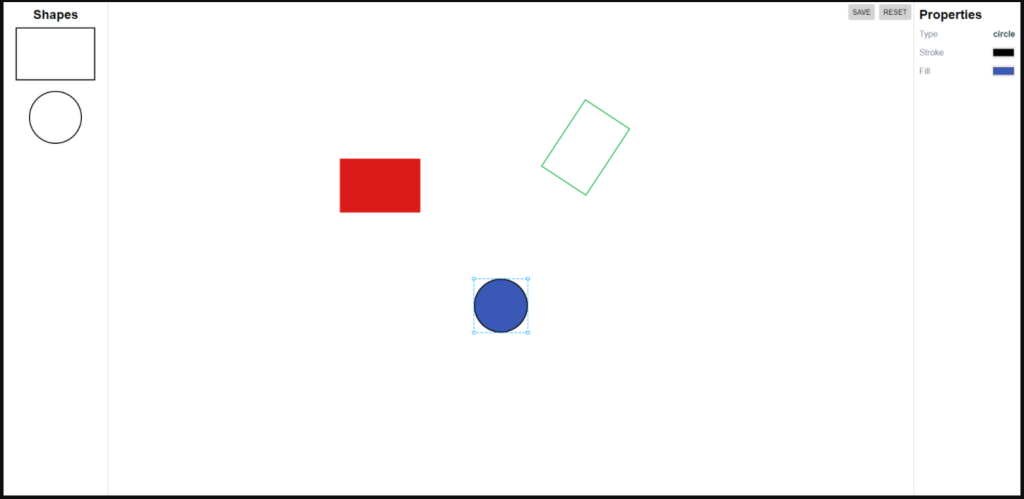
Before getting started, let’s look at what we will be building –
Features
- A left panel with shapes that we can drag and drop into the canvas in the center.
- We can select, resize and rotate the shapes in the canvas.
- We change the stroke color and fill color of the shapes from the right panel.
- Save the state of the canvas / diagram in the browser’s LocalStorage.
That’s it for this round.
NOTE: I will be using
yarnthrough out the article for running scripts but you can choose to usenpmas well. Just replace yarn withnpmequivalent commands.
Getting Started
To get started –
- Clone the repo –
git clone https://github.com/integrtr/integrtr_diagrams.git - Install the dependencies –
yarn - Checkout the
step-0branch –git checkout step-0
At this point, this is a basic react app bootstrapped using create-react-app. We have removed all the files that we don’t need like tests, serviceWorker, etc and enabled some goodies for faster development like HMR. You don’t have to worry about setting anything up.
If you start the dev server by running yarn start you will see a React app at localhost:3000 reading “Let’s get started”
Add Panels and Canvas
We will add the Palette component on the left, Canvas in the middle and Inspector on the right.
We will add all three components to the base App component.
// App.js
import React from "react";

import { Palette } from "./Palette";
import { Canvas } from "./Canvas";
import { Inspector } from "./Inspector";

function App() {
  return (
    <div className="app">
      <Palette />
      <Canvas />
      <Inspector />
    </div>
  );
}

export default App;
// Palette.js
import React from "react";
import { DRAG_DATA_KEY, SHAPE_TYPES } from "./constants";
const handleDragStart = (event) => {
const type = event.target.dataset.shape;
if (type) {
// x,y coordinates of the mouse pointer relative to the position of the padding edge of the target node
const offsetX = event.nativeEvent.offsetX;
const offsetY = event.nativeEvent.offsetY;
// dimensions of the node on the browser
const clientWidth = event.target.clientWidth;
const clientHeight = event.target.clientHeight;
const dragPayload = JSON.stringify({
type,
offsetX,
offsetY,
clientWidth,
clientHeight,
});
event.nativeEvent.dataTransfer.setData(DRAG_DATA_KEY, dragPayload);
}
};
export function Palette() {
return (
<aside className="palette">
<h2>Shapes</h2>
<div
className="shape rectangle"
data-shape={SHAPE_TYPES.RECT}
draggable
onDragStart={handleDragStart}
/>
<div
className="shape circle"
data-shape={SHAPE_TYPES.CIRCLE}
draggable
onDragStart={handleDragStart}
/>
</aside>
);
}Now, let’s add two shapes in the Palette component – a rectangle and circle. We make them draggable and also attach data-shape attribute on each of the div to be able to identify the right shape being dragged in the event handlers.
Finally add the onDragStart event handler on the div elements. In our handleDragStart handler, we use the HTML5 Drag and Drop API to set the dataTransfer value to pass on necessary data that will be used by the Drop event listener on the canvas container element. The data points we pass are type of the shape, offsetX and offsetY values of the event and the dimensions of the palette node. We can only pass string values so we need to stringify our payload object.
NOTE: We are explicitly using the browser’s nativeEvent to be able to use the
dataTransferAPI, this is because React uses Synthetic Events.
Now, we add our Canvas component.
// Canvas.js
import React from "react";
import { Layer, Stage } from "react-konva";

export function Canvas() {

  return (
    <main className="canvas">
      <Stage
        width={window.innerWidth - 400}
        height={window.innerHeight}
      >
        <Layer />
      </Stage>
    </main>
  );
}
The Stage component from react-konva is responsible for rendering the canvas element to the DOM. We set it’s height and width based on the window’s inner dimension values. We offset 400px to consider the panel on either side.
Finally, let’s add the right panel i.e. the Inspector component. We only add some placeholder text here for now.
// PropertiesPanel.js
import React from "react";

export function PropertiesPanel() {
  return (
    <aside className="panel">
      <h2>Properties</h2>
      <div className="properties">
        <div className="no-data">Nothing is selected</div>
      </div>
    </aside>
  );
}
With the some CSS in the background (you can check that in the repo). Our will start to resemble our end goal. But it’s doesn’t do anything yet.
Drag and Drop shapes from the Palette to the Canvas
We already have setup the shapes to be draggable in the Palette. Now we need to allow them to be dropped and added to the Canvas. For that we first need some state to track what all shapes are in the canvas at a given time and their properties like shape type, location, color, etc. We will also need this state in other components in the future like our Inspector component to update the attributes. So, we will make this state global. For that we will a tiny state management library called @halka/state.
Let’s make a file where we contain our global state and handlers to update that state.
// state.js
import { createStore } from "@halka/state";
import produce from "immer";

import { SHAPE_TYPES, DEFAULTS } from "./constants";

const baseState = {
  selected: null,
  shapes: {},
};

export const useShapes = createStore(baseState);
const setState = (fn) => useShapes.set(produce(fn));
@halka/state exports only one function i.e. createStore to create a global state store, as the name itself suggests. We pass it the initial state which is an object with selected = null which will be later used to track the selected shape on the canvas and shapes is an object (used as a map like data structure) which will contain all the data for all the shapes on the canvas.
createStore returns a React hook, named as useShapes here, that can be used inside any React function component to subscribe to the state. useShapes hook also comes with a set method on it which is an state updater function similar to React’s setState that can be used to update the state. We create a setState function of our own that uses immer to make nested / deep state updates easier to write.
NOTE: We are using
immerlibrary here to make it easy for us to update nested object/array state using mutable APIs while still preserving the benefits of immutable state updates. Learn more about it.
// state.js
import { nanoid } from "nanoid";

.
.
.

export const createRectangle = ({ x, y }) => {
  setState((state) => {
    state.shapes[nanoid()] = {
      type: SHAPE_TYPES.RECT, // rect
      width: DEFAULTS.RECT.WIDTH, // 150
      height: DEFAULTS.RECT.HEIGHT, // 100
      fill: DEFAULTS.RECT.FILL, // #ffffff
      stroke: DEFAULTS.RECT.STROKE, // #000000,
      rotation: DEFAULTS.RECT.ROTATION, // 0
      x,
      y,
    };
  });
};
Then, we move on to writing the function that will add a rectangle shape to the state when passed a pair of x and y coordinate values. We use nanoid to generate unique keys for each shape and save the x, y values passed along with the type and default values for other visual attributes like width, height, fill and stroke.
We can do the same for circle and by adding radius instead of width and height.
// state.js
export const createCircle = ({ x, y }) => {
  setState((state) => {
    state.shapes[nanoid()] = {
      type: SHAPE_TYPES.CIRCLE, // circle
      radius: DEFAULTS.CIRCLE.RADIUS, // 50
      fill: DEFAULTS.CIRCLE.FILL, // white
      stroke: DEFAULTS.CIRCLE.STROKE, // black
      x,
      y,
    };
  });
};
Next, let’s handle the adding of the shapes in the Canvas component –
To handle the drop of the element from the element, we have to attach an onDrop event listener.
Let’s look at how we handle the addition on shapes to the state in handleDrop handle function. We access the type of the shape dragged by accessing the DRAG_DATA_KEY payload value on the dataTransfer attribute of the nativeEvent.
Remember: We set the stringified object payload in our drag start event handler
We also need to know the x and y position of the drop event that Konva instance can understand so that we can add the shape at the location of the drop. To do that, we need to access the konva instance of the canvas. We can do that by attaching a ref on the Stage component. Now, we can access the konva instance of the canvas at stageRef.current.
To get the correct x and y coordinate of the drop location in the Canvas, we first need to manually set the pointer position in the Konva instance as if the event was raised from within the canvas itself. We can do this by calling setPointersPositions on the Konva instance and passing it the event value. Then, we get the derived canvas position back by calling getPointersPositions on the konva instance.
Based on the type dragged, we call the createRectangle or createCircle state updater function we created above. The offset of the mouse event in relation to the dimensions of the node that was dragged in the palette needs to be considered as well.
To make the drop seems seamless and add the node at the exact position where drop events happen, we need to do some offset calculations. As mentioned in the diagram above, for rectangles x and y values point to the top-left corner. Therefore, we can directly subtract the offsetX and offsetY values from the x and y values we get back from Konva.
// state.js
createRectangle({
  x: coords.x - offsetX,
  y: coords.y - offsetY,
});
// state.js
createCircle({
x: coords.x - (offsetX - clientWidth / 2),
y: coords.y - (offsetY - clientHeight / 2),
});For circle, x and y values point to the center. Therefore, we first have to calculate the x and y in relation to the mid-point of the node i.e. clientWidth / 2 or clientHeight / 2. Finally we subtract the resultant values from the x and y values we get back from Konva.
// Canvas.js
import React, { useRef, useCallback } from "react";
import { Layer, Stage } from "react-konva";

import { useShapes, createCircle, createRectangle } from "./state";
import { DRAG_DATA_KEY, SHAPE_TYPES } from "./constants";
import { Shape } from "./Shape";

const handleDragOver = (event) => event.preventDefault();

export function Canvas() {
  const shapes = useShapes((state) => Object.entries(state.shapes));

  const stageRef = useRef();

  const handleDrop = useCallback((event) => {
    const draggedData = event.nativeEvent.dataTransfer.getData(DRAG_DATA_KEY);

    if (draggedData) {
      const { offsetX, offsetY, type, clientHeight, clientWidth } = JSON.parse(
        draggedData
      );

      stageRef.current.setPointersPositions(event);

      const coords = stageRef.current.getPointerPosition();

      if (type === SHAPE_TYPES.RECT) {
        // rectangle x, y is at the top,left corner
        createRectangle({
          x: coords.x - offsetX,
          y: coords.y - offsetY,
        });
      } else if (type === SHAPE_TYPES.CIRCLE) {
        // circle x, y is at the center of the circle
        createCircle({
          x: coords.x - (offsetX - clientWidth / 2),
          y: coords.y - (offsetY - clientHeight / 2),
        });
      }
    }
  }, []);

  return (
    <main className="canvas" onDrop={handleDrop} onDragOver={handleDragOver}>
      <div className="buttons">
        <button onClick={saveDiagram}>Save</button>
        <button onClick={reset}>Reset</button>
      </div>
      <Stage
        ref={stageRef}
        width={window.innerWidth - 400}
        height={window.innerHeight}
        onClick={clearSelection}
      >
        <Layer>
          {shapes.map(([key, shape]) => (
            <Shape key={key} shape={{ ...shape, id: key }} />
          ))}
        </Layer>
      </Stage>
    </main>
  );
}
In the Canvas component, we access all the shape entries from our store using the useShapes hooks again. Then, we iterate over the array to render all the shapes as children of the Layer component. We pass the key as id along with all the shape related data as shape prop to the Shape component.
// Shape.js
import React, { useCallback } from "react";

import { SHAPE_TYPES } from "./constants";
import { useShapes } from "./state";
import { Circle } from "./Circle";
import { Rectangle } from "./Rectangle";

export function Shape({ shape }) {
  if (shape.type === SHAPE_TYPES.RECT) {
    return <Rectangle {...shape} />;
  } else if (shape.type === SHAPE_TYPES.CIRCLE) {
    return <Circle {...shape} />;
  }

  return null;
}
We will now have to create a generic Shape component that will render the correct component based on the id passed to it.
Now, we need to create the components that will render the actual shapes in the canvas.
// Rectangle.js
import React from "react";
import { Rect as KonvaRectangle } from "react-konva";

export function Rectangle({ type, id, ...shapeProps }) {
  return (
     <KonvaRectangle {...shapeProps} />
  );
}
// Circle.js
import React from "react";
import { Circle as KonvaCircle } from "react-konva";
export function Circle({ type, id, ...shapeProps }) {
return (
<KonvaCircle {...shapeProps} />
);
}Right now, we are only concerned with the shapeProps values (like stroke, fill, width, height and radius).
That’s it, now we can drag and drop shapes from the Palette and they will be added to the Canvas.
Select, Move, Resize and Rotate shapes
We start with adding the state update function for selecting and moving shapes.
// state.js
export const selectShape = (id) => {
  setState((state) => {
    state.selected = id;
  });
};

export const clearSelection = () => {
  setState((state) => {
    state.selected = null;
  });
};

export const moveShape = (id, event) => {
  setState((state) => {
    const shape = state.shapes[id];

    if (shape) {
      shape.x = event.target.x();
      shape.y = event.target.y();
    }
  });
};
For selectShape handler, we just set the id of the shape as the selected property in our state. The clearSelection handler sets the selected back to null. For moveShape handler, we first check if a shape is selected and then update the x and y coordinate values of the shape.
// state.js
export const transformRectangleShape = (node, id, event) => {
  // transformer is changing scale of the node
  // and NOT its width or height
  // but in the store we have only width and height
  // to match the data better we will reset scale on transform end
  const scaleX = node.scaleX();
  const scaleY = node.scaleY();

  // we will reset the scale back
  node.scaleX(1);
  node.scaleY(1);

  setState((state) => {
    const shape = state.shapes[id];

    if (shape) {
      shape.x = node.x();
      shape.y = node.y();

      shape.rotation = node.rotation();

       shape.width = clamp(
        // increase the width in order of the scale
        node.width() * scaleX,
        // should not be less than the minimum width
        LIMITS.RECT.MIN,
        // should not be more than the maximum width
        LIMITS.RECT.MAX
      );
      shape.height = clamp(
        node.height() * scaleY,
        LIMITS.RECT.MIN,
        LIMITS.RECT.MAX
      );
    }
  });
};
Then, we create the transformRectangleShape state update function. This function is responsible for handling the resize and rotate events of a rectangle shape in canvas. We will be using Konva.Transformer for handling these transformations in the canvas. By default, it manipulates the scale of the shape it transforms but we need to increase width and height so that other properties (like stroke width) are not affected. To translate the scale change to dimension change, we first cache the order of scale changes and reset the scale of the node to the 1 (default). Then, we just set the new current dimension value equal to the current dimension value multiplied by the scale order. The width shouldn’t go beyond the minimum and maximum limits.
Now, let’s look at the setup in the Rectangle component using the Transformer component from react-konva.
// Rectangle.js
import React, { useRef, useEffect, useCallback } from "react";
import { Rect as KonvaRectangle, Transformer } from "react-konva";

import { LIMITS } from "./constants";
import { selectShape, transformRectangleShape, moveShape } from "./state";

const boundBoxCallbackForRectangle = (oldBox, newBox) => {
  // limit resize
  if (
    newBox.width < LIMITS.RECT.MIN ||
    newBox.height < LIMITS.RECT.MIN ||
    newBox.width > LIMITS.RECT.MAX ||
    newBox.height > LIMITS.RECT.MAX
  ) {
    return oldBox;
  }
  return newBox;
};

export function Rectangle({ id, isSelected, type, ...shapeProps }) {
  const shapeRef = useRef();
  const transformerRef = useRef();

  useEffect(() => {
    if (isSelected) {
      transformerRef.current.nodes([shapeRef.current]);
      transformerRef.current.getLayer().batchDraw();
    }
  }, [isSelected]);

  const handleSelect = useCallback(
    (event) => {
      event.cancelBubble = true;

      selectShape(id);
    },
    [id]
  );

  const handleDrag = useCallback(
    (event) => {
      moveShape(id, event);
    },
    [id]
  );

  const handleTransform = useCallback(
    (event) => {
      transformRectangleShape(shapeRef.current, id, event);
    },
    [id]
  );

  return (
    <>
      <KonvaRectangle
        onClick={handleSelect}
        onTap={handleSelect}
        onDragStart={handleSelect}
        ref={shapeRef}
        {...shapeProps}
        draggable
        onDragEnd={handleDrag}
        onTransformEnd={handleTransform}
      />
      {isSelected && (
        <Transformer
          anchorSize={5}
          borderDash={[6, 2]}
          ref={transformerRef}
          boundBoxFunc={boundBoxCallbackForRectangle}
        />
      )}
    </>
  );
}
We attach the handleSelect handler on click, tap and dragStart event on the KonvaRectangle component which calls the selectShape function with the id of the shape. The event needs to be prevented from bubbling to the parent context as well. This is because we will attach the clearSelection handler on the Canvas click event. If we don’t prevent this event from bubbling up to the canvas, it will trigger the click handler on Canvas as well, causing the selection to get cleared immediately after it is set. We attach the handleDrag handler on dragEnd event which calls the moveShape function with the id. We also need to add the draggable boolean prop on it to start listening on the drag events.
Now, we need to look at how we can listen to the resize and rotate events. For this we first need to attach a ref on the KonvaRectangle component to be able to access the Konva node instance of the shape. We also need to render a Transformer component with a ref attached to it. We only want the Transformer to be active when the shape is selected. So, we render it conditionally and also add an useEffect call that is run when isSelected prop changes. If isSelected is true, then we add the shape node instance (accessed using shapeRef.current) to the nodes on transformer instance (accessed using transformerRef.current) and call the batchDraw method on the transformer to draw it onto the canvas layer.
We also add a boundBoxFunc on the transformer that prevents the shape from being transformed into an invalid dimension (i.e. stay within the min/max dimension limits).
// Circle.js
<Transformer
  anchorSize={5}
  borderDash={[6, 2]}
  ref={transformerRef}
  rotateEnabled={false}
  enabledAnchors={[
    "top-left",
    "top-right",
    "bottom-right",
    "bottom-left",
  ]}
  boundBoxFunc={boundBoxCallbackForCircle}
 />
We have a similar setup in the Circle component. The only major changes are in the setup of the Transformer component. We have rotateEnabled set to false because there is no need to rotate a circle and also resize anchors are only available on the four corners so that the height-width ratio is always intact. You can skip the custom enabledAnchors setup if you want to allow the circle to be reshaped into an ellipse.
Now, let’s take a look at how the new isSelected prop is getting passed to the component.
// Shape.js
import React, { useCallback } from "react";

import { SHAPE_TYPES } from "./constants";
import { useShapes } from "./state";
import { Circle } from "./Circle";
import { Rectangle } from "./Rectangle";

export function Shape({ shape }) {
  const isSelectedSelector = useCallback(
    (state) => state.selected === shape.id,
    [shape]
  );
  const isSelected = useShapes(isSelectedSelector);

  if (shape.type === SHAPE_TYPES.RECT) {
    return <Rectangle {...shape} isSelected={isSelected} />;
  } else if (shape.type === SHAPE_TYPES.CIRCLE) {
    return <Circle {...shape} isSelected={isSelected} />;
  }

  return null;
}
In the Shape component, we use a custom selector to check whether the selected id value in the state is equal to the id of the shape and pass down the boolean result to the Component that renders the shape.
To handle the clearance of selection on clicking the empty section of a canvas, we attach the clearSelection handler on the click event of the Stage component.
// Canvas.js
<Stage
  ref={stageRef}
  width={window.innerWidth - 400}
  height={window.innerHeight}
  onClick={clearSelection}
>
  <Layer>
    {shapes.map(([key, shape]) => (
      <Shape key={key} shape={{ ...shape, id: key }} />
    ))}
  </Layer>
</Stage>
Update the stroke and fill color of Shapes
The stroke and fill color of the shapes are set to black and white respectively by default. But, we want to allow the user to be able to update these values. User should be able to update these values for the selected shape from the right panel.
// state.js
export const updateAttribute = (attr, value) => {
  setState((state) => {
    const shape = state.shapes[state.selected];

    if (shape) {
      shape[attr] = value;
    }
  });
};
First, we create the updateAttribute state function which updates a given attribute value of the selected shape.
Then, in the PropertiesPanel component we first render all the properties i.e. stroke and fill along with the type. And on change of any of the color inputs we call the updateAttribute function with the attribute key and the update value.
// PropertiesPanel.js
import React, { useCallback } from "react";

import { useShapes, updateAttribute } from "./state";

const shapeSelector = (state) => state.shapes[state.selected];

export function PropertiesPanel() {
  const selectedShape = useShapes(shapeSelector);

  const updateAttr = useCallback((event) => {
    const attr = event.target.name;

    updateAttribute(attr, event.target.value);
  }, []);

  return (
    <aside className="panel">
      <h2>Properties</h2>
      <div className="properties">
        {selectedShape ? (
          <>
            <div className="key">
              Type <span className="value">{selectedShape.type}</span>
            </div>

            <div className="key">
              Stroke{" "}
              <input
                className="value"
                name="stroke"
                type="color"
                value={selectedShape.stroke}
                onChange={updateAttr}
              />
            </div>

            <div className="key">
              Fill{" "}
              <input
                className="value"
                name="fill"
                type="color"
                value={selectedShape.fill}
                onChange={updateAttr}
              />
            </div>
          </>
        ) : (
          <div className="no-data">Nothing is selected</div>
        )}
      </div>
    </aside>
  );
}
Persisting the state to LocalStorage
Last but not the least, we build the persistance to LocalStorage. This is probably the simplest of all.
// state.js
const APP_NAMESPACE = "__integrtr_diagrams__";

const baseState = {
  selected: null,
  shapes: {},
};

export const useShapes = createStore(() => {
  const initialState = JSON.parse(localStorage.getItem(APP_NAMESPACE));

  return { ...baseState, shapes: initialState ?? {} };
});
const setState = (fn) => useShapes.set(produce(fn));

export const saveDiagram = () => {
  const state = useShapes.get();

  localStorage.setItem(APP_NAMESPACE, JSON.stringify(state.shapes));
};

export const reset = () => {
  localStorage.removeItem(APP_NAMESPACE);

  useShapes.set(baseState);
};
We have to update our store’s state initialization code. Instead of setting the initial state directly, we pass a function to the createStore function that checks if we have some shapes state saved in the LocalStorage and generate the initial state lazily based on that.
We also write the saveDiagram function that just persists the shapes from the state in LocalStorage and the reset function that purges the current state as well as the LocalStorage.
Finally, we add two buttons that trigger the Save and Reset actions.
// App.js
<div className="buttons">
  <button onClick={saveDiagram}>Save</button>
  <button onClick={reset}>Reset</button>
</div>
That’s all!
We have our diagram authoring tool ready for usage. It might be minimal in terms of features, but it is definitely a solid base to build on top of.
Now that you are familiar with the fundamentals of HTML5 Canvas, do try to build on top of this & share in your cool projects with us.