


In organizations that work on applications made for a global audience, serving the users in multiple languages is an inherent requirement. The process of supporting this multilingual usage is known as Internationalization (i18n).
For a lot of these organizations, internationalization cannot be an after-thought but an integral part of the development process. Nevertheless, implementing it can be a bit of a hassle as developers might not know all the languages they want their application to be translated into. Even if they use translators like Google translations, translating all the textual content in the application manually can be a cumbersome task to do. Other than that, it also gets difficult to take inputs from non-technical users when the language files are committed with your source code usually in GitHub.
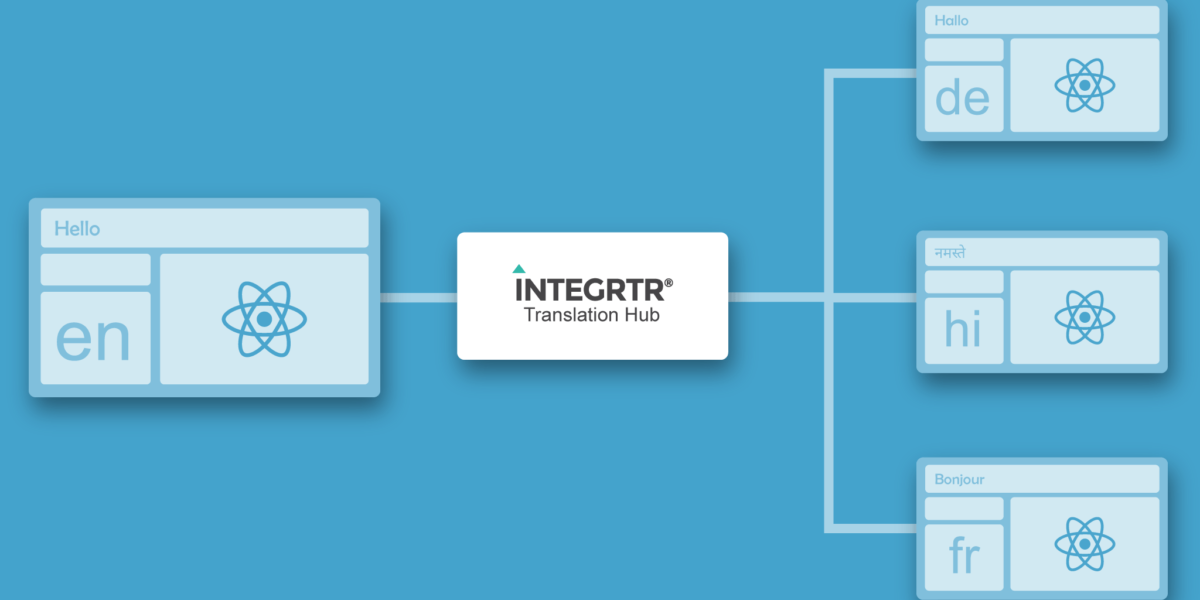
We at INTEGRTR build ERP softwares that are used across the world so internationalization has always been an important part in our development process and we faced similar problems. Hence, to solve these problems and to make internationalization simpler and easier for us, we came up with a solution, and now we are ready to bring it out in the world. We call it – INTEGRTR Translation Hub, our one-stop go for internationalizing all our applications in a blink of an eye! What Translation Hub does is, it simplifies machine generated translations, helps manage manual translations and also keeps your translations in sync with your version control system like git.
In this blog, we will be taking a look at how we can set up internationalization in a React app and how we can use INTEGRTR Translation Hub to manage translations for our application. But, for that we will first need an application first.
To demonstrate the internationalization features of Translation Hub, we created a minimalist game in React. So, before jumping further into internationalization and Translation Hub, let’s briefly go through the game once.
Note: This blog only covers the setup of Internationalization in a React app and how we can use INTEGRTR Translation Hub to translate the app. The logic for the game won’t be explained here.
Here’s the glimpse of the game. Colorful, right? Play it here.

The game is called ColorShuffle. Playing it is really simple! All you have to do is rotate the circles in the second row by clicking/tapping on them and match the upper quadrant of the circle with the color displayed above. Every time you click/tap a circle, the adjacent circles rotate as well. All you have to do to win is, get all the upper quadrants of the circles to match with the respective color displayed above in as few spins as possible. That’s ColorShuffle for you.
If you want to take a look at the source code of the game, feel free to dive into the GitHub repo.
Let’s set up Internationalization in our app!
Now that we know what Internationalization is and we have seen the app we are building, let’s talk about how we can set it up in our application using React Intl.
Introduction to React Intl
React Intl is a part of the FormatJS, a collection of JavaScript Internationalization libraries. This library provides us with React components and APIs to help us with internationalizing strings, dates, and currencies.
You can read more about react-intl here
Installation
We can install the library react-intl using a package manager like yarn or npm
yarn add react-intl
Note: I am using
yarnin this article for our package management needs but you can choose to usenpmas well. Just replaceyarnwithnpmequivalent commands.
Setting up
The first thing we need to do is create a folder named intl in /src folder (you can put it in the root folder as well if you prefer that) and add a default file named i18n.json or i18n_en.json in it.
You can add your own custom prefix instead of
i18n
// i18n.json

{
    "COLOR": "Color",
    "SHUFFLE": "Shuffle"
}
This default file is where the key-value pair for all the textual content of our app goes.
Once our default file is up, it’s time to import this file in App.jsx and create a state to handle the locale.
// App.jsx

import {IntlProvider} from 'react-intl'

const selectedMessages = (lang) => {
  switch (lang) {
    // we will add cases for other languages
    // as and when we add the i18n files for them
    default:
      return en;
  }
};

export default function App() {
  const lang = window.location.pathname.split('/')[1];

  const [locale, setLocale] = useState({
    selectedLang: lang ? lang : 'en',
    messages: lang ? selectedMessages(lang) : en,
  });

  return (
    <IntlProvider locale={locale.selectedLang} messages={locale.messages}>
      <div className="container">
        <GameName />
        <Game />
        <Options appLangs={appLangs} locale={locale} updateLocaleState={updateLocaleState} />
        <ExternalLink />
      </div>
    </IntlProvider>
  );
}
lang is the language we are grabbing from the URL. If the URL specifies a language then we use that particular language and put it in the selectedLang property of our state and selectedMessages() is a function that returns us the message object for the language we are passing as an argument.
Once the state is up, it’s time for the action to begin…
React Intl provides us with an Internationalization Context Provider called <IntlProvider>. All we have to do is wrap our application with this provider. By wrapping our application with <IntlProvider> we make the Internationalization context available to all the React components in the application.
As you can see in the code above, we are passing two props to <IntlProvider>:
- locale: locale is the current language we want our application to be translated into.
- messages: contains all the translated strings related to the selected language.
Based on the props provided <IntlProvider> passes the necessary context to all the components wrapped inside it and translates the app.
The default language file is in place now, the Internationalization Context Provider is all set, so the next step is to find all the textual content in our app and wrap them with <FormattedMessage>.
// GameName.jsx

import React from 'react';
import { FormattedMessage } from 'react-intl';

export function GameName() {
  return (
    <div className="game-title">
      <span>
        <FormattedMessage id="COLOR" />
      </span>
      <span>
        <FormattedMessage id="SHUFFLE" />
      </span>
    </div>
  );
}
In the <FormattedMessage> component, we are passing an id which is the key to the translated string (key-pair values in the language file) we want to use there. We have to do this for all the textual content in our application and that’s it, the setup is complete! We push all these code to our Github Repo.
Note; INTEGRTR Translation Hub has a tight integration with Github as you can only add repos from Github as of now!
Now that we have set up internationalization, we can see that we just have the language file for English. But, we want to support other languages as well.
Like I mentioned in the beginning of the blog, a developer might not know all the languages and adding all these translations to the app manually can be a tedious job and here is where INTEGRTR Translation Hub comes to the rescue!
Enter INTEGRTR Translation Hub!
INTEGRTR Translation Hub is an application designed to translate our GitHub projects in a breeze. It supports both private and public repositories and IS ALSO FREE TO USE!
Know more about INTEGRTR Translation Hub in its FAQ Section
Now the question is how do we use INTEGRTR Translation Hub to translate our GitHub projects?
Using INTEGRTR Translation Hub is a piece of cake. Let me take you through how you can use it.
1. Visit INTEGRTR Translation Hub : https://translate.integrtr.com
When you click the link you will reach the landing page of Translation Hub. You can see what the landing page looks like in the below image.
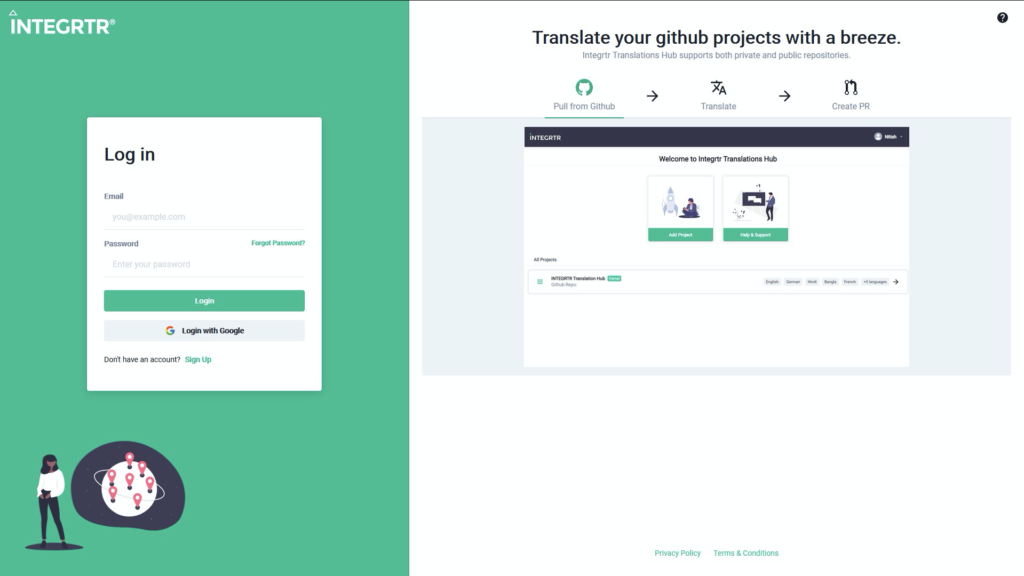
2. Login/Sign Up
If you don’t have an account, you can either create an account by selecting the “Sign Up” link or login in with your Google account. Once you have signed up, you’ll receive a confirmation email. After confirming, you’ll be redirected to the login page where you will have to fill in your credentials and you’ll log into the application.
This what the main screen of the app looks like:
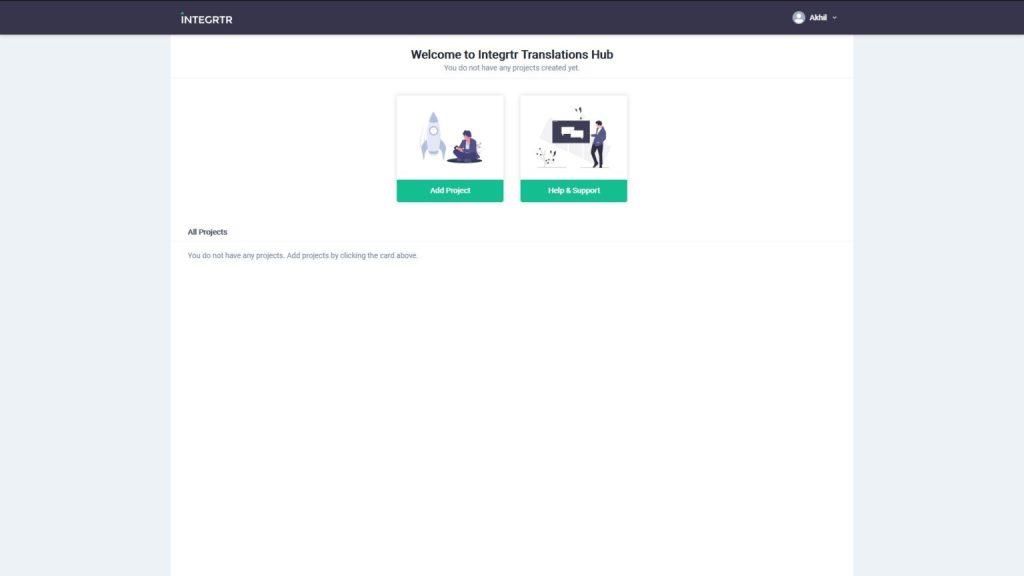
3. Add Project
To get started with translating our application, we will have to add a project by selecting “Add Project”. After that we’ll have to log in with our GitHub account and we will able to see the below screen:
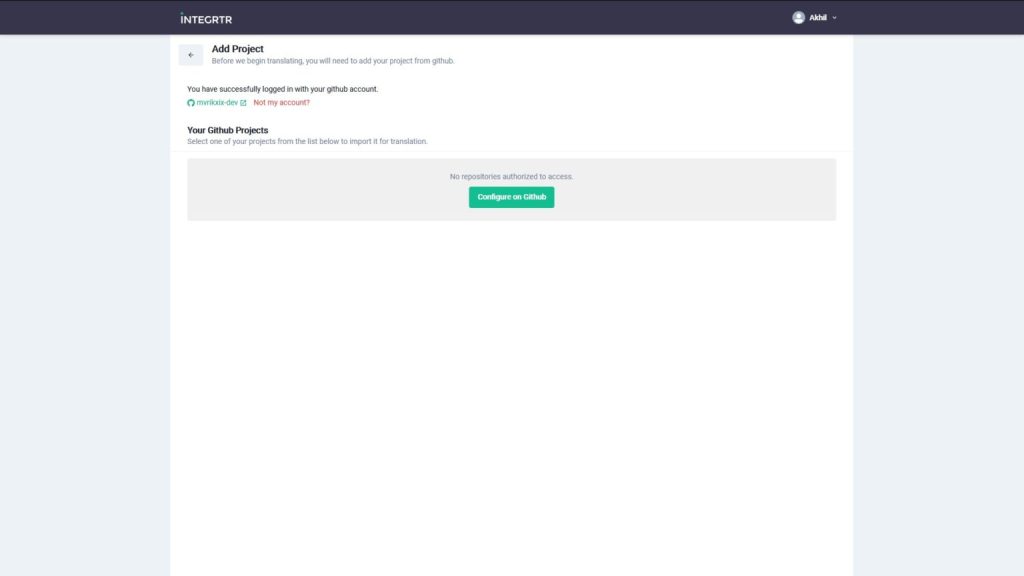
The next step is to allow translation-assistant to access our repositories. We can do that by selecting the “Configure on GitHub” button which will redirect us to a GitHub Page where we will asked to authorize the repositories that we want it be aware of.
If you have used any CI/CD or deployments tools integrated with Github, this flow should seem familiar.
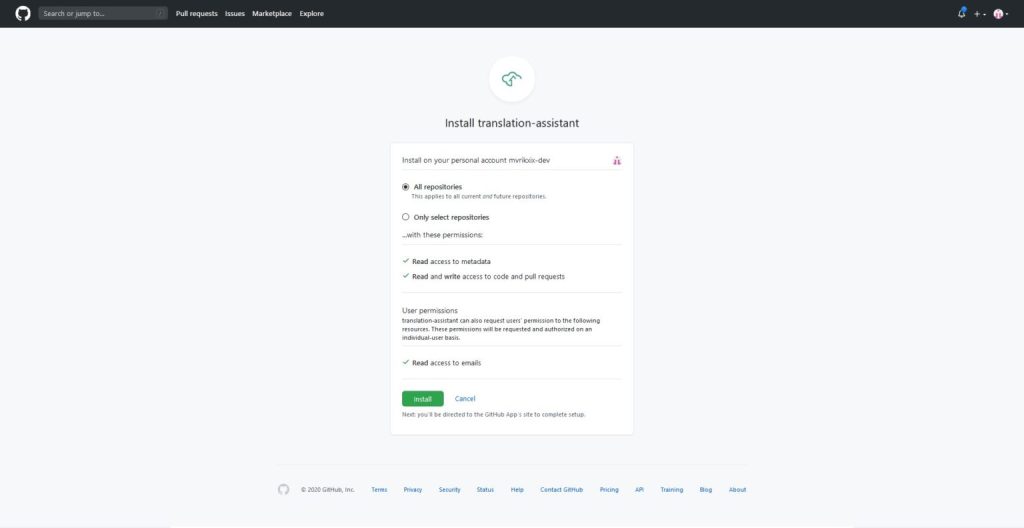
After installing the translation-assistant, we will be able to see that our repositories are now populated in Translation Hub.
4. Configuration
Click on the repository you want to translate and you will be redirected to the below page:
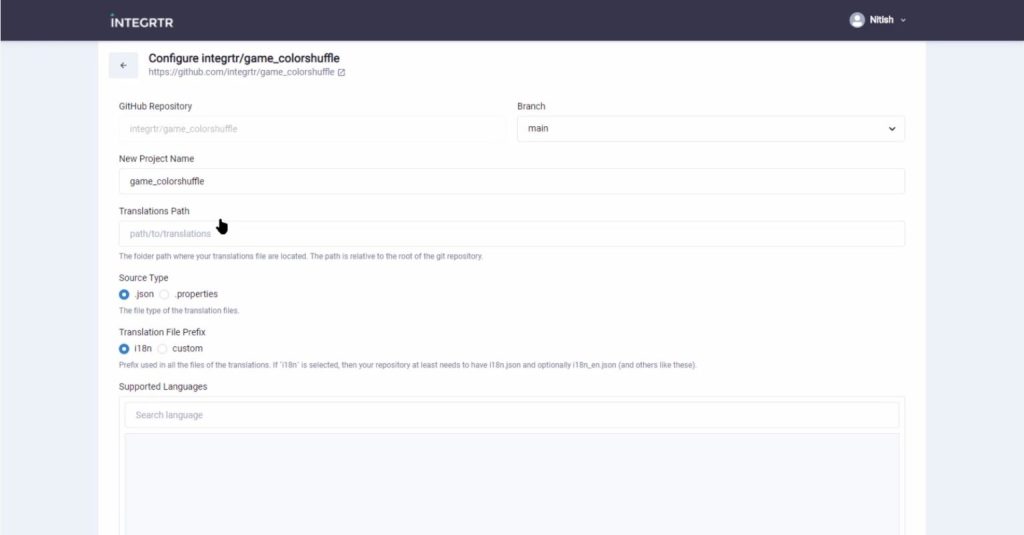
Here the first thing we will have to do is select the primary branch of our GitHub Repo in the Branch field. In the New Project Name field, we can add the name of our Translations project.
Then in the Translations Path field, we will have to add the path of the folder where all our language files are saved (for me it is src/intl/ ).
In the Source Type field, we’ll have to select the source type of our file whether it is a .json file or a .properties file.
Next, we will have to select the Translation File Prefix we have used in our language files (all my language files are saved with an i18n prefix: i18n.json).
The final thing to do is selecting the languages we want to translate our app into. Once all these steps are completed, click next and let Translation Hub do the magic!
Note: Your files might not be saved with the i18n prefix, in that case select the custom option and add the custom prefix you have used in your files.
5. Translation

Now that we have done the configuration, let’s move on to translating our app. The page you see above, is where all the magic happens! We can either add the translations manually or automatically.
To do it manually, all we have to do is type in the translated text into text fields. To do it automatically, it can be done either by individually clicking the Translate button on each text.
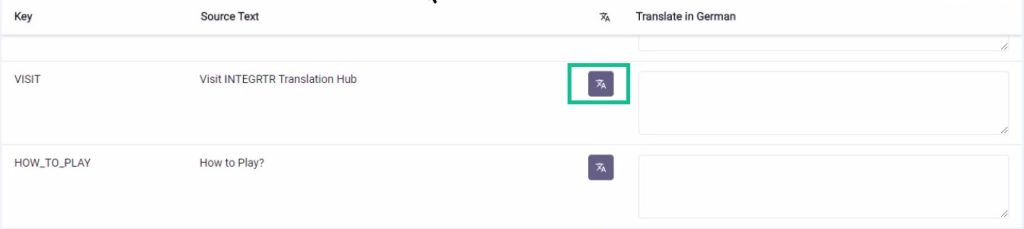
Or by clicking the Translate All button on the top right corner to translate all the text at once.

Once we have translated all the text, the next thing we have to do is save the translations by clicking the Save button at the bottom right corner of the screen.
In case, you want to collaborate with someone to translate your applications, you can do it by clicking on the “Customize” button and adding the email id of the users you want to add in the Project Members field. This will send them an invitation to use Translation Hub and then you can work together with your team on translating your application.
6. Integration
Now that we have translated all the texts in our application to the desired languages, it is time to integrate them in our application and we can do that in two ways:
- Exporting the files
- Creating a PR (the easiest way)
On the top right corner you can see three vertical dots, click on it and you’ll be able to see two options, Export and Create PR.
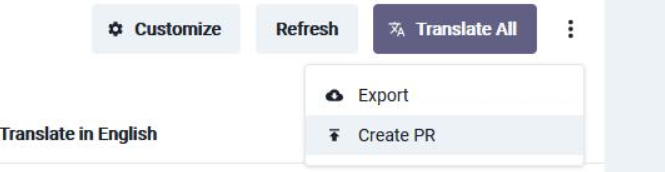
By selecting the Export Option, you will download a .zip file containing all you translated languages which you can extract into the translations folder of your application.
By selecting the Create PR option, a PR will be created in your GitHub Repo with all the changes in it. You can approve the PR and it will get merged to your master and Viola your translation files are a part of your application now!

The above image is how the PR will look like, all you have to do is merge the PR with your primary branch and then you are good to go.
Once the translation files are in, you can import the files to App.jsx , add them to the selectedMessages function and continue with building the logic for language selection.
// App.jsx

function mergeWithDefault(messages) {
  return {
    ...en,
    ...messages,
  };
}

const selectedMessages = (lang) => {
  switch (lang) {
    case 'de':
      return mergeWithDefault(de);
    case 'bn':
      return mergeWithDefault(bn);
    case 'hi':
      return mergeWithDefault(hi);
    case 'kn':
      return mergeWithDefault(kn);
    case 'en':
    default:
      return en;
  }
};
The mergeWithDefault function merges the selected language with the default language i.e. English. This prevents the application from breaking in case some translations of the selected language are not available.
In case the translated strings of the selected language are not available, the app will display the English variant of the text since we are merging the selected language with English.
Now, you can update, add or remove translations with ease. If you are making changes to existing languages you don’t even have to write any extra code. From translation to PR creations can all be taken care of by Translation Hub.
Conclusion
Multilingual applications are not easy to build but with tools like INTEGRTR Translation Hub, we hope to make the process simpler and easier. Go ahead and try out INTEGRTR Translation Hub to make your React app accessible all across the world.